Turtle Butt
As I knit Sheldon from Knitty the phrase what's up turtle butt? keeps going through my head. Was that a grade school joke or is my inner 5 year old simply amused at the word butt?

Anyways. I am finally knitting Sheldon, just one of the many things on my "to knit" list. I put the Tomten on hold, because I want to send Sheldon to my nephew for his 1st birthday on February 14. I just finished round 45 on the body and have done about 15 rounds a day. I haven't done the time-line but I hope I can make my deadline. I'm being sort of boring with my first Sheldon and knitting him in the called for yarn in the colors green apple and butter. His body as you can see is green apple and his shell will be butter with green apple contrast.
Tomten
I started knitting a Tomten at the end of December. It took a couple years for this pattern to grow on me, the pictures in Knitting Without Tears are just not all that appealing, but then I found the Zimmermania blog and started seeing gorgeous cute Tomtens on gorgeous cute toddlers and decided that I had to knit it. I decided to knit it for one of my fellow alums' toddlers (not really sure who yet, as I can think of 6 fellow alums with toddlers) in our school colors. I don't think any of us were really big on the whole dress with school spirit thing, but the maize and off-black cotton-ease yarns appealed to me and are sort of spirit-ish without screaming "I've got school spirit yes I do, I've got school spirit how 'bout you?" So I bought 3 skeins of Cotton-ease in maize and one skein in the off-black. 880 yards should be enough for a toddler sweater right? [cue ominous music]
The tomten is a really fun pattern when it isn't completely boring. I knit a rectangle with just over 1-220 yard skein in garter stitch before I got to any of the interesting bits of the pattern. And last week, I finished the hood (don't try to graft/kitchener after 11 pm is my advice) with 7 inches of the second skein to spare. But this is where I ran into a problem: my vision for the tomten involved knitting the entire body and hood in the muted yellow and then finishing it with an attached i-cord in the off-black. And if one skein of yarn gave me 24 1/2" by 8 1/4" (or 4,256 square garter ridge stitches*) I didn't think I was going to get two sleeves that start out 6 1/2" deep (or approximately 2,380 square garter ridge stitches each). So I had a dilemma. How should I knit the sleeves?

All off-black (letter jacket-eh)? Black and maize stripes (bumble-bee)? Neither option appealed to me so I took the third route: hunt like crazy for another skein of maize in the same dye-lot as the 3 skeins I already have. The crazy, one-in-a-million route (well, thanks to Ravelry I did have slightly better odds if I stash-stalked).
Before I started digging through the mountainous number of cotton-ease owners on Ravelry (2164 entries in "stash") I checked at a fabric store I happened to be at that also carried yarn, no luck. And as we headed home from dinner tonight I asked The Husband to stop by Michael's, I mean it is where I bought the yarn four months ago. The bin with maize cotton-ease was pretty full and I pulled each one out to check the dye lot number and stashed them in other bins, they had between 15 and 20 skeins of this color. The very last skein, when I was convinced I was going to knit the Tomten sleeves in a contrasting color, ended up being my dye-lot number – it was the only one of that dye-lot. Hurray! In disbelief I checked the number again. And then I put the rest of those skeins back in their bin and headed to the register (5 minutes to closing no less) and then I triple checked that number while waiting to check-out. But silly me decided to tell you more happy ending instead of actually knitting.
*garter ridges stitches are a completely fake unit of measure that I made up for purposes of figuring out if I had enough yarn. I simply calculated the area of the primary body rectangle and the area of the sleeve trapezoid using stitches and garter ridges as though they were inches/feet/your preferred measurement unit for length.
FO: the 2007 sweater
Remember last January when I was planning my first sweater? No, that's okay, I forgot too. Well I bought the pattern (in February I think) and I did a couple swatches (in June or July) but then I never actually cast-on. The first two swatches didn't come out to gauge, and I had other projects on the needles so I kept getting put off swatch #3 and suddenly 2007 was practically over; I hadn't even cast-on and I still had finished this baby toddler bolero that I started in March and that had to be done before the child would outgrow it.
In April I lost one of the straight needles I was using for this project, but that had a happy ending when I discovered the joy of Bryspun circular needles. In July I finally finished knitting the sleeves,which felt like behemoths compared to the short bolero fronts and back pieces. Then in September (I think) I went out and bought Nancie Wiseman's Knitter's Book of Finishing Techniques to help me get over my fear of seaming knits (fabulous book btw, it now lives in my knitting bag). Sometime after that I got up the nerve to pick up all 225 stitches along the collar. And then in December, while flying to visit our family over christmas I ran out of yarn while casting off (a picot cast-off) the shawl collar on the plane. About 40 stitches from the end! And I had no other knitting with me and a few more hours stuck in a plane.

Luckily I still had a bit more yarn packed in my luggage and the airline did not loose that luggage. So I was able to finish casting-off the morning we arrived at my MIL's house, I started seaming up the arms and sides that night at my mom's and then the next day in the car on the way to visit S&E. I was weaving in the ends just minutes before we met up with S&E and "Ladybug". But luckily the sweater fit 🙂

I didn't talk about this sweater much during the knitting process because I discovered E's blog and she discovered my blog (thanks Ravelry). I wanted it to be a surprise, not a christmas suprise, but such is life.
Pattern: #1646 Bolero and Hat by Sirdar [double knitting], it is sized 0-3 months up to 5-6 years; I knit the 3-4 year size and Ladybug turned 3 a week ago.
Yarn: Sirdar Snuggly DK, 3-50 gram balls around 191 yards each, nylon/acrylic blend, (25 grams leftover, including the swatch)
Time: late March to late December with a lot of "zzzzz" time
Knitting Needle Organization
Warning this post is long on detail and how-to as well as photos. If you aren't sewing inclined you might want to skip reading down to the very bottom where I talk about sewing alternatives (or skip it altogether if you are knitting inclined either).
A couple months ago, I got frustrated with the state of my needle drawer. I was looking for a needle I swore I had but could not find it. So I pulled out Stitch n Bitch and looked at their instructions for an organizer. At one time I thought I was all about the needle roll, but then I realized I don't want to carry all my needles with me all the time. Plus I prefer circular needles and the less kinks in them the better (of course my bryspuns don't have kinks in the first place). Anyway, I didn't like the idea of attaching the needle organizer to a clothes hanger but did like the hanging aspect. I also thought the directions were fiddly, so I didn't follow them, just used the finished size as a guideline for my work.

What I did
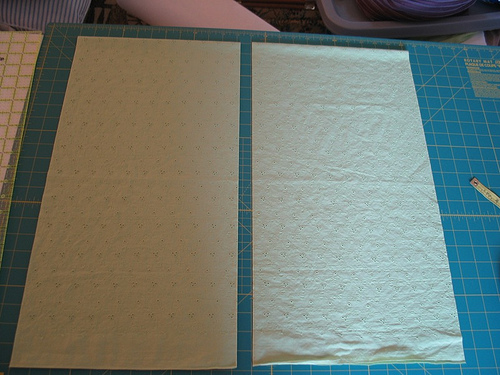
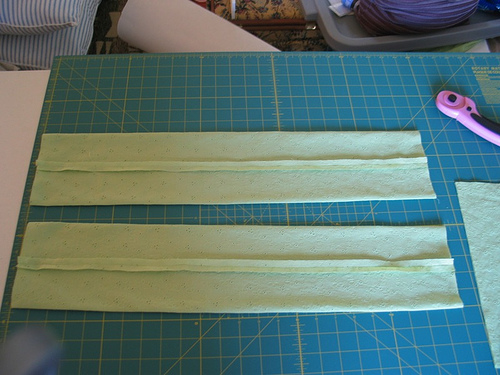
I cut two pieces of fabric twice the width needed (plus seam allowances), two pieces of peltex craft interfacing the length & width of my finished product. I seamed each fabric rectangle once along the long edge for a tube, turned it right-side and centered the seam. Then I pulled the peltex into each flattened tube. If your fabric is heavier than the lightweight eyelet I used you might not need interfacing (or be able to use a lighter fusible interfacing).
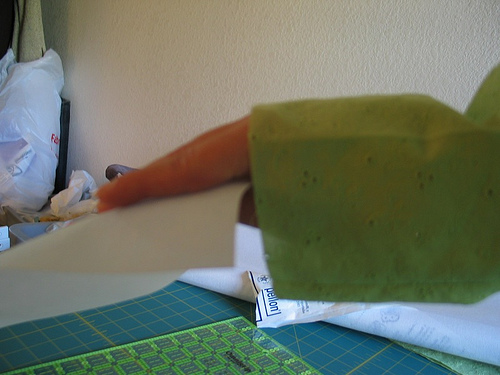
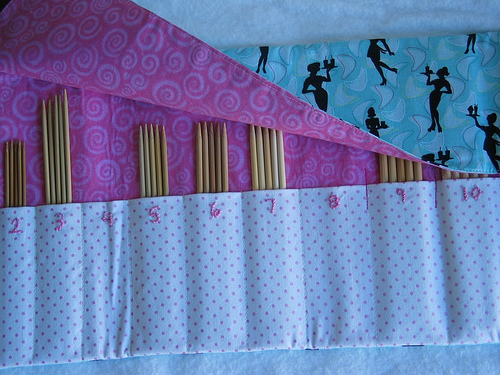
I put both pieces together interior-sides together (so the seams were on the inside) and did a small seam on the top & bottom (short edges). Then I flipped it inside out (so the exterior sides faced each other) and seamed the top and bottom again to enclose the raw edges. I flipped it right-side out again and marked my seams for each circular needle size slot and stitched those, then spent a long time hiding the thread ends. Finally I used a couple thumb tacks to hang it on the wall and inserted my needles. Officially this still needs the needle sizes to be labeled. I am looking for the right buttons to do that (or maybe I'll break down and make them, or get lazy and find a fabric marker).


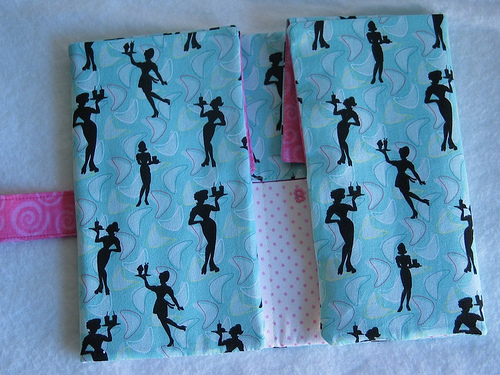
I also made a DPN roll. I know I said I don't like the idea of needle rolls, but I realized that this could be stored with my yarn stash. The goal is to condense the knitting supplies into this one box. I think that is just so the sewing supplies can take-over, but that is another story. Plus I also had these two fabulous fat quarters that I was itching to use.

What I did (apologies, I forgot to take photos)
This time I grabbed a bit of freezer paper and laid out all my dpns (in the packaging) and basically traced them onto the freezer paper (lining them up on a bottom straight line, and making sure they fit within the width of my fabric) to figure out how tall the finished needle roll should be. Then I cut out an exterior fabric, an interior fabric, a pocket fabric (same size as the exterior & interior but then I folded it in half), interfacing for the pocket, interfacing for the body, an exterior flap, and an interior flap (these were about half the height and the same width as the exterior/interior pieces).
I ironed on some interfacing to the pocket piece, then folded it in half along the longer axis and ironed it*. I ironed interfacing to the wrong side of my interior fabric and placed the pocket on the right side, lining up the bottom edges. At this point I used a erasable fabric marker and made the lines for my pocket stitches; Go ahead and seam the very ends too, this makes the final step easier. It took a little bit of figuring on the freezer to paper to get the distances right. I made the pockets for the smaller needles smaller than the larger needles. Once this was done I pulled the threads through to the wrong side and knotted them.
Setting the main piece aside I put the two flap pieces together (right sides together as is Standard Operating Procedure) and seamed up three side, leaving one long side open for turning it right-side out. Turn this right side out and iron it. If you have a directional pattern for one or more of your fabrics make sure that the open edge is at the top of fabric pattern.
Now you make a fabric sandwich. The bottom layer is the interior piece with pockets (wrong side on the table, right side visible). On top of this lay your flap making sure its raw top edge is lined up and centered along the interior's top raw edge. You want your exterior flap fabric to face out (be visible); if you are worried about catching the short edges when you sew the side seams you . Finally you place your exterior piece on top of these pieces, wrong side down and making sure all the edges line up nicely. Pin this together. You should not see any of the right-side of the fabric just the wrong side. Starting seaming this together. You will first place your needle around the 3/4-of-the-way on the short side of your fabric sandwich, turn at the corner, seam one long side, turn at the corner, seam the other short side, turn at the corner, seam the other long side, turn at the corner and seam about 1/4 of the original short side. Don't forget to back stitch at the beginning and the end. This should leave an opening about 1/2 the width of the short side which allows you to turn your sandwich right-side out. Don't forget to trim your corners before turning it right-side out. You might want to use a chopstick or something to poke the corners out nicely. You might tug gently on the flap and then iron everything. I hand stitched the opening shut, but if you wanted to you could top-stitch around the entire thing to close it.
Now I made a fabric strip and added velcro to it for my closure but you could use a wide ribbon (or ahead of time add buttons/snaps/velco at the appropriate spots on the exterior fabric). I also embroidered the needle sizes on the pockets after sewing this together; I bet it would be easier to do before you sew it together, but after you mark the pocket stitching lines. I put some notes on my flickr photos and can try to draw up some diagrams if my written instructions are confusing (and diagrams are requested).

Finished Object: Scarf
I haven't been finishing many projects lately. Either they are awaiting that one final embellishment or I just stop working on them to pick up another project. I did finish my scarf for this fall about a week after I started knitting it, I just forgot to take pictures and post about it. Then it went missing in my own home; TheHusband found it for me hiding between the couch and the wall.
Last Sunday I took it out for a photoshoot (actually we were just heading to the park, I was wearing the scarf and grabbed the camera).

I'm really happy with the scarf, it is about 2 1/2 inches wide when the ribbing is relaxed, and I made the length long enough that it will wrap around my neck nicely but not so long that I can't let it hang open. And I keep getting compliments on it, which is really cool. Unfortunately this yarn has gotten a couple snags from the snag-free velcro on my favorite bag. In the end, I did use more than one skein of the yarn, but I had bought two skeins anyway, I just don't have enough leftover for a hat. (Reminder stats: Yarn-Lana Grossa Cool Wool Big, Pattern- Single Cable scarf from One Skein by Leigh Radford, don't remember the needles but that is personal preference anyway.)

One Skein Scarf
On Saturday we went for apple hunting (you call it driving to apple orchards, I call it apple hunting). Instead of bringing a current work in progress (the socks, the baby blanket, but not the bolero–that has "must work at home" status) I cast on for a scarf with some yummy green yarn I bought this past spring. I had jotted down the pattern on a 4 x 6 index card and decided, this is a scarf that is supposed to be 3 inches wide, there is no reason to swatch.
So I cast-on and at row 6 (the first cabled row) I realize that I forgot to write down which direction the cable twists, I decide to wing it and knit away. About 4 inches in (woot for worsted weight yarn again) I loose count of rows and because I am incapable of partially frogging when slipped stitches and cables are involved I rip the entire thing and cast-on again (trying the cable in the other direction) and knit about 4 more inches. Once we get home I discover that I was cabling in the wrong direction. While it would have been fine, I decided to rip out those 4 or so inches and cast-on again. I'm sort of grateful I didn't get more done during the drive.

This time I pull out the safety pins to help me count my rows to keep my cable twist nice and even. So after 3 cast-ons and 8 inches of knitting wasted I sit down for TV watching (3 discs of Grey's Anatomy season 3) and now have 17 1/2 inches of scarf. I've used about half my skein of yarn (Lanna Grossa Cool Wool Big) but I think I want my scarf to be more than three feet so I won't get to use that second skein of yarn for a hat. Boo. I didn't bother swatching, right now my scarf is about 2 1/2" wide instead of the 3 inches the pattern says it will be.
And it is taking lots of will power to not cast on for about 4 more projects that I want to do right now. But I need to finish something first.
Catching up
Two weeks ago at this time I was just beginning to get panicky about the state of my house since my family was due to arrive in the middle of the week. I was also Ikea-izing my house. I finally made it to Ikea for some bookcases. We bought one basic, short Billy bookcase for the upstairs hallway. That hallway is freakishly wide and so a thin bookcase works quite well there. It also helps anchor a large framed photo that we finally hung on the wall. We also bought a Traby unit to use as a buffet-type piece in the dining room. Now some pretty servings bowls that did not fit in my cabinets and most of my cookbook collection are stored in that bookcase-like piece.
A nifty thing about Ikea: you can take your basic used alkaline batteries and compact florescent bulbs to Ikea for recycling. They have some bins near the exit to collect those items. This thrilled me because I knew you were not supposed to dispose either thing in the trash, but didn't know where to get rid of them (did I really have to hang onto such things for the annual county hazardous waste collection, that always ends up being scheduled on the Saturday that I am out of town?). I know this doesn't help everyone as not everyone has reasonable access to an Ikea…

This morning we made very delicious blueberry pancakes. I had a favorite pancake recipe, it is on page 426 of The Good Housekeeping Illustrated Cookbook (my book is the Reader's Digest edition, copyright 1980). I didn't even have to look the page number up, and barely need to look at the recipe. I learned to cook using this cookbook and fantasized over the picture index as a kid. But this recipe might just be replaced by the Light and Fluffy Pancakes from The New Best Recipe.

This is the second time I've made TNBR's pancakes (with buttermilk). And they are so so good, exactly as the title says, they are light and fluffy. Today we added blueberries to the recipe (and they instruct to drop the blueberries onto the pancakes once you drop the batter onto the pan, not to stir them into the batter where they color it blue and all drop to the bottom–we actually did that before TNBR though). To be fair to the TGHIC, I have never tried their buttermilk waffles pancake recipe on page 427 and it is very similar to TNBR's recipe.
I also mixed up a batch of Mexican Cocoa in a Jar this morning. While I'm sure the layered look makes a better presentation, this wasn't a gift (and is currently stored in a covered pyrex bowl) so I didn't bother with the layers and went directly the to "dump in a bowl and stir" part of the directions. FWIW, 1 1/2 discs of Ibarra makes about 3/4 cup chopped Ibarra. Overall I'm happier with this cocoa than most of the 'add hot water' mixes I've bought in a store lately, but if you make this variation do no try to drink the last tablespoon in the mug since it is gritty. I really wonder if the Ibarra is necessary at all and plan on mixing up a smaller batch with just powdered milk, cocoa powder, sugar, salt and cinnamon. If anyone sees powdered milk that isn't "nonfat" please let me know.
Finally, I've been plugging away at the Dream Baby Granny Square Blanket and now have 17 squares finished (the goal is 48 squares). My knitting projects are plagued by the "must sit down and concentrate on it" disease so I haven't made any progress there. But I did start another pair of Fetching because I needed a car project.
Sock knitting question
I am so close to casting on for a new project, so close yet not quite there. Okay, so I'm not counting the hat I cast-on while sitting (yes sitting since I arrived at 7:30 pm) in line for the final Harry Potter Book, I guess I should have tried to dress more Hermoine-like that night since I was going to be knitting.
I've cast-off the sleeves of the baby bolero. I still have the edging on the sleeves, back and then the shawl collar. But now I can use though shiny pretty bryspun US6 needles for a new project since the edging requires a smaller needle.
But back to the sock knitting question. I have 2 skeins of panda wool that I will be making into socks for myself. I can't decide if I should come up with a pattern on my own using a pretty stitch and basic sock guidelines or should I go with something published. But what I really can't figure out is:
Why do the various cabled socks I find still have ribbing on the cuff? In my brief time working simple cables, like on Fetching, the cable itself is stretchy. Simple cables strike me as a prettier option to simple ribbing but I've seen several sock patterns with cables that still have ribbing at the cuff.
More knitting
Sorry for you folks who'd like to hear about the rest of my life. I'm not doing much really. Okay, so I am traveling to Atlanta to go to a friend's wedding this weekend. I'm very excited, I get to see my best friend and her family for the first time in almost a year (and hopefully other friends). Plus I still regret missing another college friend's wedding due to work craziness almost two years ago (they hit a crunch period and were not approving vacation time, a work-buddy nearly quit over that). Other than, I'm not doing a whole lot I swear.
Anyway, my knitting progress.
I made TheHusband a camping hat to keep his head warm at night (since nights do get a bit chilly). This is thinner and lighter than his alpaca hat I made him in December. It is my basic hat non-pattern, I didn't do a gauge swatch and just did a test fit after about 3 inches. Which meant of course that I had to rip out those three inches and cast-on 8 stitches fewer than the first time. Here are the stats:
Yarn: RYC cashcotton DK in sage and RYC cashcotton 4 ply in seafoam held double
Needles: US5 (16" bryspun circs, then bamboo dpns)
Cast-on: cable (I know it isn't very stretchy but I like the look), 112 stitches
4 rows or so of garter stitch then stockinette, no clue how many rows…

I am also almost done with the toddler sweater that I started at the end of March. March people, sigh, it is a good thing I picked the larger size otherwise the recipient might have outgrown it before I finished (fingers crossed). I think it is what I deemed my June UFO challenge, cause I was just getting tired of knitting it, and now it appears to be part one of my July UFO challenge. I have about 8 more rows to go on the sleeves, the bottom edging, the sleeve edging, blocking, some seaming, the shawl collar, and more seaming and blocking plus a button to find and attach.
I am knitting the sleeves at the same time, which is both a blessing and a curse. I've had to stop a couple times to count my rows because I forgot which direction I was knitting and had one sleeve on each end of the needles. But no wonder if feels like it is taking forever:

The sleeves (which I am knitting at the same time, sigh) are way bigger than the front. Oh the front pieces went so quickly once I got over the shaping hurdle. What are those pink threads? Various markers of mine to keep my brain straight. I have a pink bit between the sleeves so I don't knit them together, I have pink stitch markers so I know when I finally get to stop doing my decreases, I have a pink line from when I got mixed up in which direction needed to be knit and the number of stitches did not help (no more knitting this while visiting with friends). And I really need to finish these sleeves* so i can use the needles for my next project, a pink tank top, and hopefully finish while it is still warm enough to wear it.
*the edging and collar is worked on a smaller needle
the socks are done!
Remember these socks? How could you, have I written about knitting anything else?

They've been sitting around my house like that since the beginning of May. I stalled at the kitchener stitch. I had never done it before and so I looked at my handy Vogue Knitting Quick Reference. It walked me through the first two steps, but on step 3 it through me in the middle of the work. Agh. I checked other knitting references; FantasyLibrarian sent me copies of the pages from her knitting go-to book, but I still was stuck at the same point, "when do the stitches come off the needles and where do I insert the needle on step 3?". I looked at Knittinghelp.com's video of kitchener, which was better, she finally mentioned that the first stitches on either needle are not treated quite the same as the rest of the stitches, but it went so fast that I couldn't keep it straight or remember how to do it once I picked up my needles. I let the project linger and moved on.
Almost two weeks ago I sat down to figure kitchener stitch again (it sort of made me feel a little better that Grumperina has to check her notes before sitting down with it as well). I watched Knittinghelp.com's video (scroll down to the section on finishing), taking notes and hitting pause and rewind many times. Then my friend J sent me the link to this Knitty article. Oh if only I had started there instead. I practiced a couple times on swatches I made just for that purpose (now what should I do with a 3" white square with one red stripe?). Oh, and for anyone who is interested in trying a "knitted" kitchener check out TECHknitter's instructions (it wasn't the needle that scared me off though I found this idea interesting).
Finally with the help of the following on a note card:
step 1: purl #1 front stitch
step 2: knit #1 back stitch
———-
step 3: knit #1 front stitch, slip
step 4: purl #2 front stich
step 5: purl #1 back stitch, slip
step 6: knit #2 back stitch
——
repeat steps 3-6, the second stitch is now the first.
Muttering, "knit slip purl, purl slip knit" also helped a lot. Then to end it I used knitty article guidelines (when there is only 1 stitch on each needle you do step 3 and then step 5).
Of course today I sit down to finish these socks and can't find my handy-dandy note card, the knitty article came to the rescue. Now I have these socks almost all done (I hid the ends for picture-taking-in-daylight purposes). I finally finished my May UFO (or was it April).